Line Cutting
Let’s take a close look at the pattern you are going to
cut. At first it seems to be a good pattern with all of the detail that you
want. But looking closer at it you discover that the lines are hard to follow.
Why ?
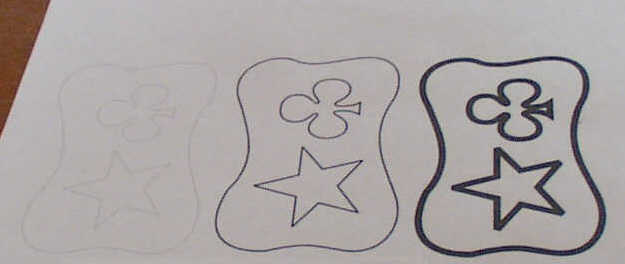
The first problem with lines on many patterns is that the line weight is too wide. We know that the kerf cut by the scrollsaw blade is small, so why do some of the patterns come with lines so thick that we could cut the line and still leave remains of the line on both sides of the cut. Just where did the designer plan on having us cut . Following the outside of the line, the center of the line, or taking all of the line. Maybe they are just trying to tell us that we can vary on the cut anywhere near the line.
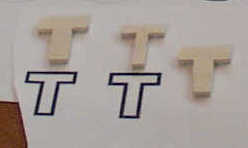
We notice that the " T " at the bottom all look different. The line was followed on the outside, inside and stayed on the line, but a little diagonal. It really changed the final appearance of the project. That is exactly what can happen to any project with the wrong line weight.
Many patterns are not so detailed that the lines need to be
followed exactly. For example on a teddy bear it may not make much difference if
the body is narrower on one side than it is the other. One foot may be a little
larger. But it sill looks like a bear when it is cut out. But when we cut things
that have narrow bands left like letters, if the width of the letter “T” is
wide at the top and narrow at the bottom, we will see that. These examples are
telling us that we can come close to the line on some patterns , but on others
the line needs to be followed almost exactly. And that is really the way it is,
some line can be missed and never show up on the finished project. The way I
look at it is that the pattern designer really missed when they drew the
pattern. I am actually cutting where the designer met to draw the line. I hate
have to clean up their mistakes for them!
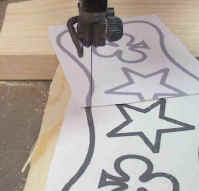
The thicker lines may look easier to see, but they will be harder to follow. The fact that the kerf can be narrower than the line , makes a line very hard to follow.
Notice how the blade is hard to see in the dark black line. But when the copy has been made in a lighter gray color the line is easier to tell from the blade. If you cannot change the line weight or color, red is easy to follow, then lightening the copy to gray may be a good option.
On some of the patterns there are places that are determined by the wood thickness. A slot for a tab of wood to be fit in would be a good example. In these cases you need to compare your wood to the drawn slot. Determine if you need to cut all of the line, leave the line or just plain redraw a new line. Even plywood can vary from different runs, so it is a good idea to always check the thickness when the pattern is dependant on it. If you are making boxes for example and the front is the length of the bottom plus the thickness of the two sides, the wood thickness can make a difference. You can easily adjust most patterns to fit any size wood you use, but you need to do this before you cut the pattern out and find there is a problem.
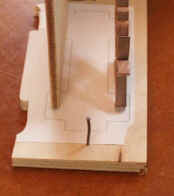
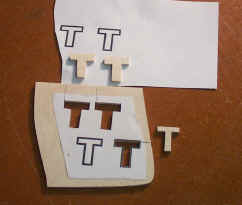
The original pattern was drawn suggesting using ¼"
Baltic Birch Plywood, that fits the slots perfect. On the left ¼" oak
plywood has been substituted, that is too thin for the slot. On the right is ¼"
walnut substitute that is too thick for the slot. This slot need widened enough
that you may need to widen the tab also.
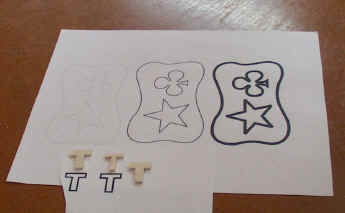
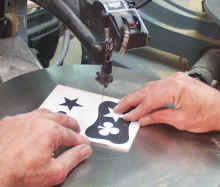
Notice how the blade really disappears when the whole pattern is black. Turning this pattern to gray on the copier may be the only way to solve this problem, other than tracing a new pattern.
Now even if the line is thin it may still be hard to
follow. A black line with a black blade in poor light is hard to follow. At
times you can set the copier to copy lighter and make the line gray instead of
black, and the gray lines are easier to follow. Sometimes it is easier to follow
a red line than a black line. You can take a pattern to most photocopy shops and
have then copy it in red. But with computers today you can scan the pattern in,
and then use one of the many computer programs to change the line color and
print it out on your computer. Saving the file makes it real easy to print as
many of the patterns as you want at any time. Another pattern that is hard to
follow is a black silhouette. With all of the black the blade seem to disappear
into the pattern. Tracing the outline of the pattern may be the only option to
correct this problem.
A lot of the scrollsaw patterns use 1/4” Baltic Birch
Plywood that is actually measured in MM. If you change the wood and use 1/4”
Oak Plywood as a substitute then the pattern lines are likely going to be wrong.
Even hardwoods are not surfaced planed to the same thickness all of
the time. If you are resawing and planning you own hardwoods, try to
plane all of the wood for the project at the same time. You may find that having
to go back and surface one more piece , the thickness may not match the first
run you made. And this can cause some problems when assembling the project.
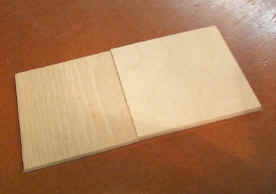
Notice how much thickness difference there is between the
oak and Baltic Birch Plywood. This is why you always need to check the
dimentions of the stock you are using , verses what the pattern actually called
for.
If you are cutting out flat work that is one piece or maybe
stacked pieces, the thickness differences may never be a problem. The only thing
to keep in mind here is that the wood should look proportionate to the project.
For example 3/4” wood for a delicate ornament , may not look as nice as the
same pattern cut from 1/8” wood. Even items like a jewelry box made from ½”
wood or 1/4” wood can change
it’s image drastically. The ½” could portray a cumbersome bulky look
, where the 1/4” would show of the delicacy of the cutting.