Tune-Up & Repairs to the Dewalt
The blade clamps would put a slight bend to the blade after numerous holes on
fretwork that made it difficult to feed the blade through 1/32" holes. I
found out now that the allen screw and thumb screw that hold the blade have
burrs on them that need to be filed off. Take both screws out of the blade clamp
assemblies, top and bottom, and file them smooth. After doing that the blade
doesn't bend anymore when doing a lot of fretwork. As the saw get used more the
blade clamps have a tendency to build up and not work properly. Take the
thumbscrew clamp out of the saw and make sure the end is clean and pivots
freely. Do not try placing oil on the pivot. Some have had problems over
tightening the blade clamps and stripping the threads out or breaking the clamp.
Most of the time this goes back to the fact that the fact that the clamps had a
build up of oil and dirt that let the blade slip. About all of the blades we buy
have a very fine oil on them, and this builds up on the clamps. So they just
tightened the clamp harder. If they had just cleaned the clamp when the blade
started slipping, the extra pressure put on the clamp wouldn't have been needed.
I did have some problems getting it to cut a tight "v " pattern
like grass, but in talking to others who now own them, that may have been an
alignment problem with the blade causing it. So one of the first things to check
on the saw is the blade alignment. If the blade is off side to side you can make
it run true by adjustments. Check the blade for side alignment by setting a
ruler against the side of the blade, while the arm is in the full down stroke.
Then hold the ruler in place and raise the arm to the top of the up stroke. The
blade should not have had any side movement to it. If it did then use the allen
screws on the left side of the blade clamp to move the blade over in the blade
holder until it is aligned. By moving the top and bottom screw the blade can be
centered into the table slot. I have aligned the blade in my saw now and it made
a world of difference in the way the saw performed. So check the alignment
out before you even try the saw.
Some have had a problem with the switch not working. The solution that one
person found was too use a spray can of electrical contact cleaner to blow into
the switch. It makes me wonder it the spray blew the dust out of it, holding the
contacts open, or if it was the actual contacts in the switch that were in need
of cleaning. When I have the switch problem I'll try using the air compressor to
blow the switch dust out first.
Stopping the knock on the Dewalt: I too experienced this knocking noise when
I turned my speed above 5. There is an easy fix for this problem, and should
only take you 10 to 15 minutes to accomplish. The problem is the tensioning rod
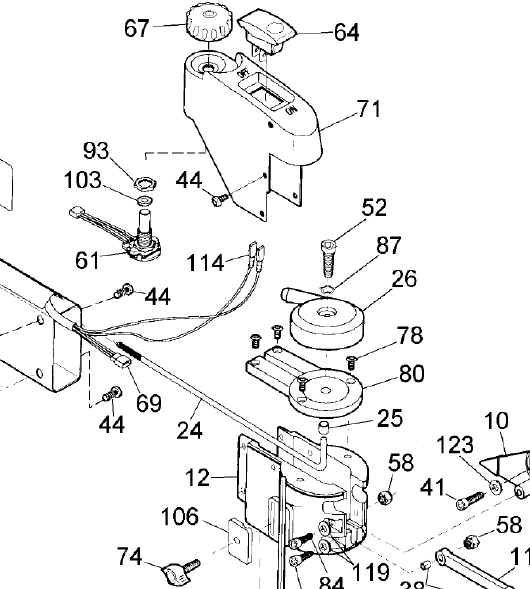
is slapping the upper arm housing. Take your manual with the exploded drawing of
the upper arm and table and follow these instructions. Loosen and remove the
on/off switch assembly (four Torx bolts). this will give you access to the cam
that adjusts the tension #26. With an allen key remove bolt #52 and cam #26.
Remove four Torx holding the head assembly #44. This will give you access to the
tensioning rod #24. It needs to be adjusted, but to do so you need to move the
head assembly out from the arm. this will then drop down allowing free access to
the tensioning rod. The tensioning rod screws into a fitting #23 buried deep
inside the saw arm. to remove the knocking noise you need to adjust the
tensioning rod #24 counter clockwise (lengthens the assembly). Try one full
turn, re-assemble and see if it solves the problem. If not repeat this procedure
in one full turn increments until the knocking goes away. It only took one full
turn to solve my knocking problem. My saw now works like a charm, and it was a
quick and easy free fix. I hope this helps.
For a parts breakdown on the Dewalt go here:
http://www.toolpartsdirect.com/cgi-bin/tpd.cgi/breakdown/dewalt/DW788_TYPE_1
Butch ( Taken from a post on Sloan's discussion board )
An article by Bill Young on tuneup: Setting Up a Scrollsaw For Stack Sawing
There is no big secret to stack sawing. I use a DeWalt saw and have been
ridiculed for saying that I stack saw most of my work, by people with saws three
times the price of mine. That is what prompted me to make the simple setup
required available to anyone it might help. First off, you need really good
blades, so use a high quality blade of your choice.
Next, make sure your
blade is tensioned really tight. I don’t use the push sideways or the plucking
for a certain sound method at all. I just crank it up tight and I’m ready to
go. The main problem most people have when stack sawing is either the blade is
giving a cupping pattern from the top to bottom or the top is narrow and the
bottom is wide or vise versa which makes it very difficult to remove the waste
wood when fret sawing. Also on fine work, the top can be perfectly sawn only to
find later that the bottom piece can be off far enough as to be not usable.
Cupping is generally caused by a bad habit of pushing sideways on the blade as
well as not enough tension. Push straight in on the blade without forcing it
sideways and let the blade to the cutting. For some it is helpful to place the
stool (or standing position) a little to the right of the blade because the cut
always goes to the left due to the manufacturing process of most blades. This
way makes it easier to push straight into the blade. Now the important part.
You’ve heard it said…..the saw is set up from the factory and requires no
adjustment. That, for the most part is wrong. If you are cutting a single piece
of wood and the blade is not exactly 90 degrees to the table, it’s not much of
a problem because the waste wood will easily slide out of the top or bottom.
That is typical of a factory set saw. Now, with the saw still set up the same,
try stack sawing 1/8” Baltic birch six deep on delicate fretwork. You have a
nightmare on your hands. You can’t get the waste wood out and the top and
bottom pieces are a different size. Here’s how to correct it. First off, if
your saw is a DeWalt, lay a ruler (or something thin and flat) on the saw table
and up against the Side of the table. Now, at the end of the motor shaft, there
is a slot where you can insert a screwdriver and turn the motor over by hand to
raise and lower the blade. If the blade touches the ruler at one end and not the
other, loosen the thumb screw on the right side of the blade holder and then the
screw in the left side with an allen key whichever way it takes to make the
blade track straight throughout the stroke. If your saw is not a DeWalt, then
look for another way of making this lateral adjustment. It is a good point to
keep in mind when upgrading to a better saw. Upgrading doesn’t necessarily
mean going up in price. Some of the$1,000.00 and plus saws don’t have this
feature so going way down in price to DeWalt could also be considered an
upgrade. The saw blade has to be EXACTLY 90 degrees to the table. Get a small
square and put it on the table and up to either side of the blade. Yah, I know,
you haven’t got a square that small. Well one of those little plastic ones out
of a school kids protractor set will do. Now loosen the big knob under the front
of the table and adjust the blade and table to match the square and tighten the
knob. That was easy.. now we’re all set up right?……Wrong. Those little
squares are not accurate enough. That was just to get it close. But we’re not
playing horseshoes here so close doesn’t count. Now we’re ready for some
fine tuning. Get some waste wood that’s between 1-1&1/2 “ thick. With a
tight blade, start the saw and run a piece of wood in and twist and turn in
every direction and then exit close to where you entered. The waste wood should
easily slide in or out from top or bottom. But it won’t. This tells you that
the blade is not yet properly set. Now is when you get a chance to test your
patience. You need to loosen the knob and adjust the table ever so slightly to
left or right because at this point we’re not really sure which way it should
be. Tighten and run a piece in as before. It’s either going to come out in the
opposite direction which means you’ve gone a little too far so a little fine
tuning back just a little will put it right on. When you have it set that the
waste will easily slide in or out from either the top or the bottom, you have
achieved perfect 90 degree alignment. Make sure that the adjustment knob is real
tight now. After all that, you don’t want it to get bumped out of alignment.
I’ve had people say.. what about when I want to tilt the table for some angle
cutting. Do I have to go through this again if I go back to straight cutting?
The answer is yes but after a few tries at it, it does get quicker and easier
and if you want to do accurate, easy, trouble free stack sawing, this is the
only way regardless of the make or price range of the saw. I have a cardboard
box sitting to the right of my stool and all my waste wood cuts are simply
tapped on the edge of the box and the pieces just slide out. And that’s the
way it is with a perfectly set saw. Hope this has helped anyone that is serious
enough to take the time to do the job right. Work safely.
Bill Young
Subject: Re: Dewalt knocking
Date: 12/05/01
Posted By: Marvin, learnest@ix.netcom.com
I had the same problem with my Dewalt.
I couldn't use the fix from the website listed above because I don't have an
"exploded" diagram with part numbers shown. I called Dewalt and they
mailed me a fix that simply involved removing the plastic cover on the switch,
and the tensioning lever underneath. This gives you access to the cover on the
tensioning rod. You remove the bushing from the rod. Push the rod back about
1/2", remove the screws, lift the front and it slides off. On the underside
of the cover you can see light marks where the top arm hits the bottom of the
cover. You can simply sand down the rounded underside of the cover where the
marks are. Worked dandy on my saw. The Dewalt number is 1-800-4dewalt.
Posted By Warren on the WOOD discussion group.
Subject: Re: 788 tune-up
Date: 01/21/02
Posted By: warren59,
warren59@carolina.rr.com
#M1079177
Ken,
All DeWalt saws have the play in the blade holders. I don't know why, it just is
and its not a problem. When the saw is running the holders will center
themselves. I don't like Rick's way of squaring the blade with the table, its
not the way to do it. Do it this way, Position your thumb screw and set screw on
the top and bottom so that a blade sets in the center of the blade holders. Put
a blade in the saw, turn it on and run it, turn it off. Check that the blade is
square with the table if its not do this. Look at your exploded parts view at
the bottom half of the saw. Locate #46 the knob for tilting the table. Now look
for #44 the
screw that holds on the zero detent assembly. Loosen that screw #44 and the
whole assembly (table and all) will move enough for you to square the blade up
with the table. When square, tighten the screw #44. Doing it this way, your
blade is in the center of the holders and your zero detent is set at zero.
Warren
Wobbly tension knob
I found out how to fix the loose wobbly tension knob on the dewalt
saw this weekend. Just take out the 4 star screws on the plastic
housing for the on off switch on and you'll find a large allen screw
on top of the tension knob. Just tighten that down hard and replace
the cover and the 4 screws. Just passit along for someone who is
having problems with a loose wobbly tension knob like I was.
Bill
Teflon coated top
11/27/04
Rick,
First I would like to compliment you
on the great job you have done helping others with all the information you
supply on your web page. In our Scroll Saw Club I have had three people in the
last week that were having problems with their saws. I told them to get the
information from your web page. Two of them came back and said their Dewalts
are now working better than when they were new. The third one will try to do
the same with his Delta this weekend.
Another problem that can be easily solved.
Rather than having to sand the table top and wax it periodically is to have
the top teflon coated. I had mine done at IMPREGLON, INC., 220 Fairburn Indust.
Blvd., Fairburn, GA. 30213. Pres. Curt Jarrell Phone# 770-969-9191. The
cost is about $25
I had my table coated about a year ago and
have not had to apply wax to kep the surface smooth since having it coated.
Areal time saver and no concern about getting wax on the finished product.
Regards,
George North
3206 LaVenture Dr.
Atlanta, GA. 30341-3615
Article sent to me by Ron Brown
1/15/2006
Please check the
distribution list and if you know someone with a DeWalt Scroll Saw who is
not on the list, forward this to them. If you don't have a DeWalt Scroll Saw
or know someone with one, please disregard.
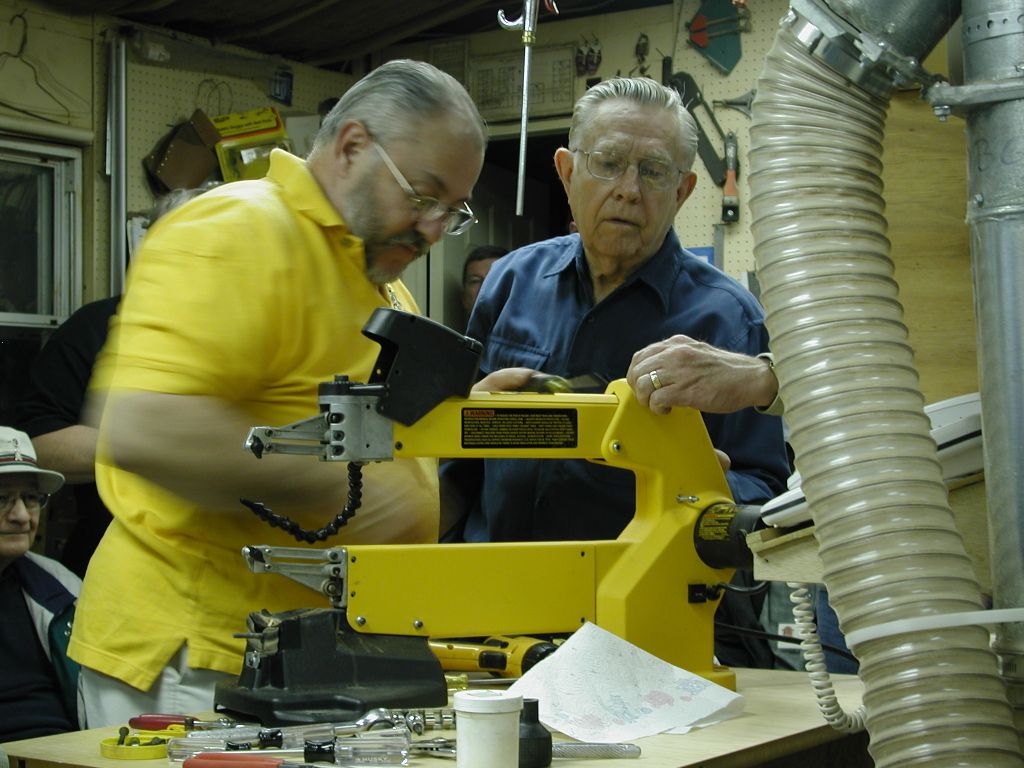
Dear Friends:
The attached photos
were given to me by one of our new members. I taught a class at the January
meeting of the Gwinnett Woodworkers
Association's Scroll Sawing Special Interest Group where they were
taken. I added a few of my own. George North complained of
excessive noise coming from his DeWalt scroll saw and asked if I would take
a look at it. We turned it into a group project.
Lessons learned and
clearly illustrated in the photos:
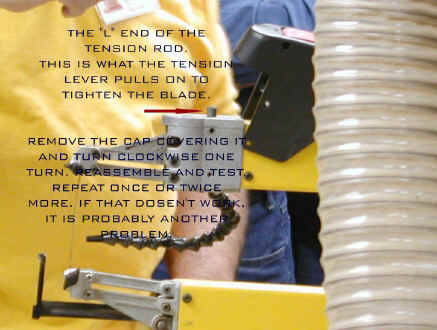
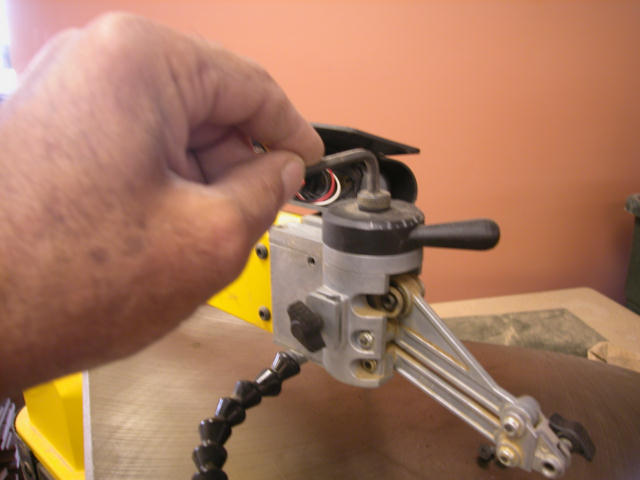
- Adjusting
the "Blade Tension Lever" to get more tension. The
lever is connected to an "L" shaped threaded rod connected
to a steel wedge. Simply remove the plastic cover on the upper arm. Remove
things on top of the lever itself until you uncover the tension rod.
Turn it one turn clockwise. Reassemble and test. If it needs more, repeat
one turn at a time until you get enough tension - three turns would be a
lot and one usually does it.
 Here is an excellent article by Rich Hutchinson on the subject. http://www.scrollsaws.com/SawReviews/DewltTuneUp.htm
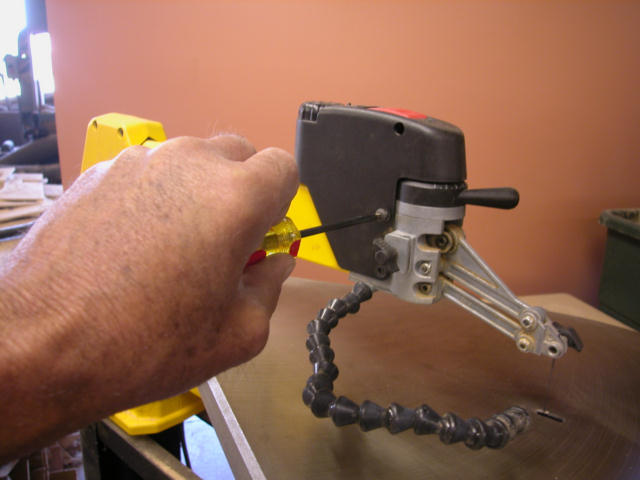
- Accessing
the On-Off Switch for
cleaning and adjustment. Removing the plastic housing on the
front of the upper arm grants access to the switch. It can fill with dust
and become inoperable. It has contacts like older cars have ignition
points which can burn and pit. The factory suggests replacing
the switch and so do I. However, to keep working in the meantime, try this
work around at your own risk. With
the tool unplugged, disassemble the
switch housing (careful, it is fragile and easily broken) being careful
with the spring loaded parts. They can shoot out like a rocket! Clean
the contacts either by scraping or sanding. I also use compressed air
(where appropriate), paper towels and alcohol on a Q-tip. Reassemble and
it should work like new. Order your new switch in case it fails
again. First try just compressed air to remove the dust. When that doesn't
work any longer - replace the switch and order a backup for next time.
Note: some of the members suggested using a foot switch to avoid
having to use the switch on the saw altogether.
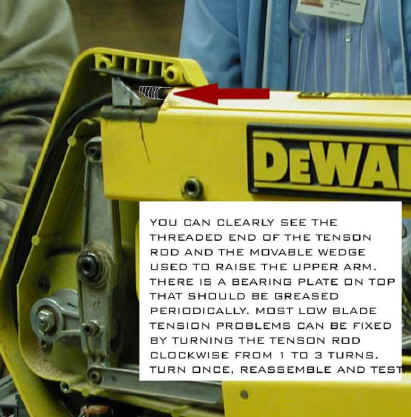
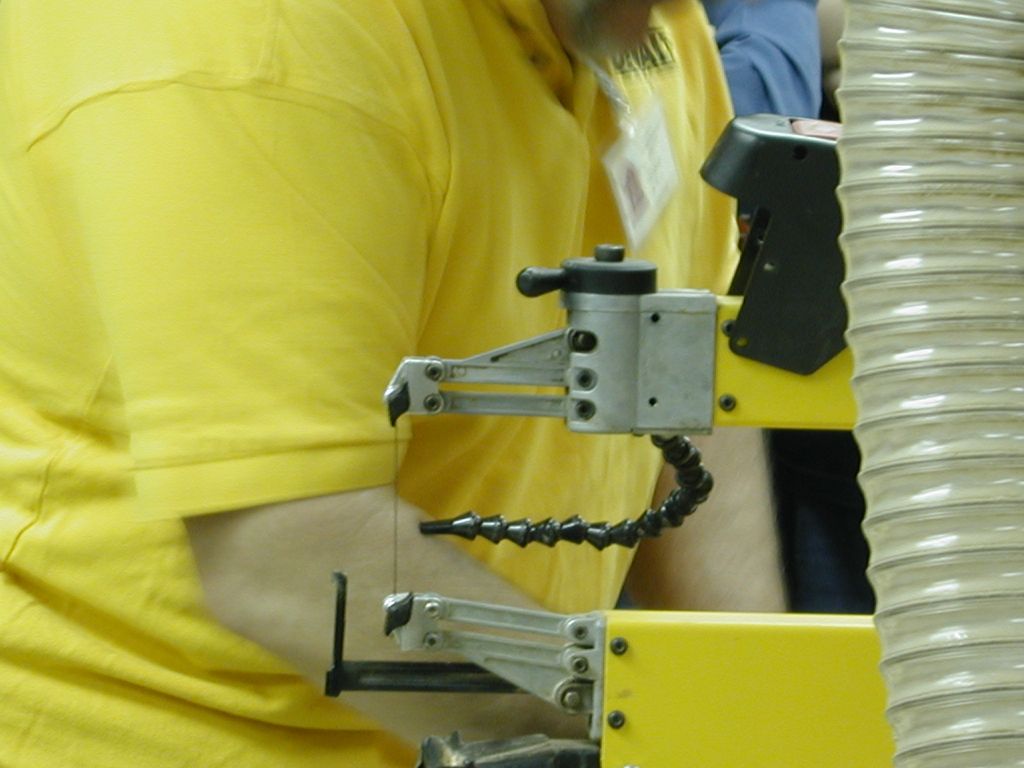
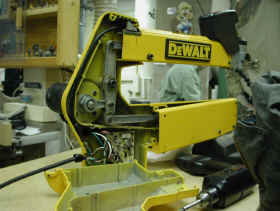
- Lubricating
the main roller bearing and the Blade Tension Wedge. I completely
dissembled George's saw due to the noise and in the interest of showing
everyone what a DeWalt 788 Scroll Saw looks like on the inside. I
wanted them to see the motor eccentric, the pivot arm and the connecting
rods which drive the parallel arms at the front of the saw. It is amazing
to see just how minimal the movement around the motor really is
(about 3/8") and how, through leverage, it translates into
about 7/8" vertical movement at the front of the saw. This is also a
great way to see and lubricate the steel wedge which is used for blade
tensioning. You really shouldn't have to lubricate these parts more
often than every 4-5 years or so even with very heavy use.
- Bolt
Tightening. Simply tightening all of the bolts (except where the
upper arm pivots at the housing) will often significantly reduce the noise
your saw makes and eliminate most of the vibration.
- Adjusting
the Blade Holders. George complained that the lower blade holder
would no longer grip the blade.
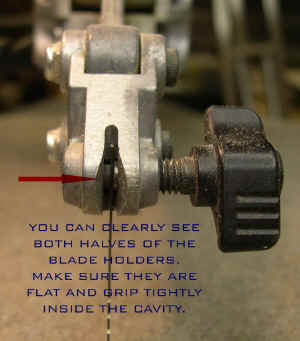
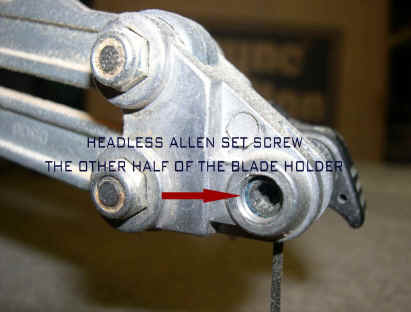
A
quick examination of the headless Allen set screw, the other half of the
blade holder, revealed that it was backed off too much and was actually
below the surface of the aluminum casting. There was nothing for the blade
to bear against when pressed by the thumb screw side of the blade holder.
This was an easy fix with an Allen wrench.
That was a lot to
accomplish in an hour! I did the reassembly after most folks had left and
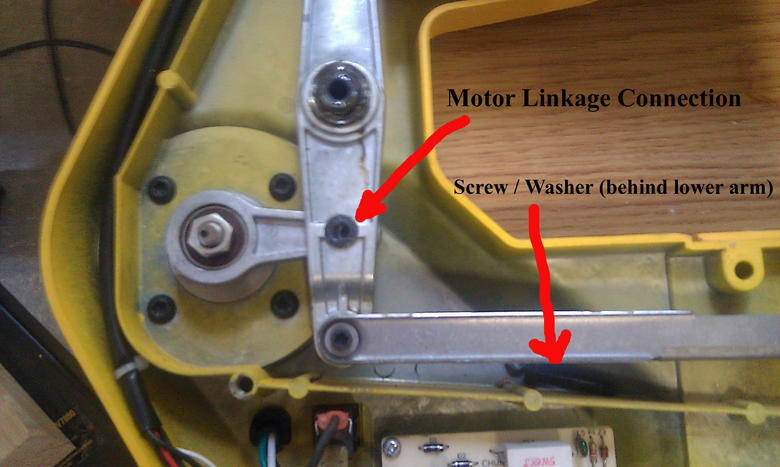
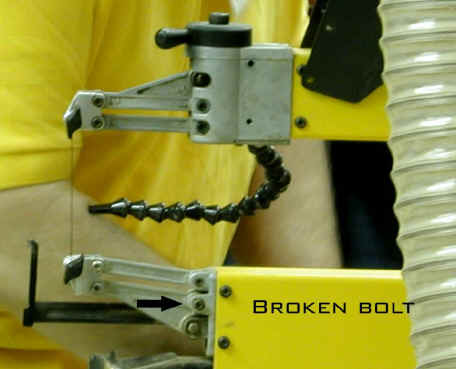
yes, I did get it back together. We discovered
the cause of the excessive noise and vibration was a broken pivot bolt on
the lower parallel arm. There are three bolts. The center
one was broken in half, but had not fallen out. George had been using it
this way for months and even continued to use it this way until his new bolt
arrived 4 days later!
Ron
Brown
(770) 682-9394 Office
(770) 312-9087 Cell
More
pictures of the above article.

Problems with the blade distance being too
long
There
is a minor problem with the newest crop of DW788 Scroll Saws. The spread
between the blade holders has lengthened slightly due to a manufacturing
problem with the wedge. The result is difficulty inserting the blade into
the blade holders because there is only about 1/8" above and below
the holders.
Just
wanted you to be in the loop so here is a cc of the most recent email.
Spoke
with Larry today. He is not a direct line manager, but rather a 1-800
phone specialist. He has had conversations with the engineers and
discovered that the DeWalt Plant Engineers believe the current crop of
wedges were cut out of spec. The engineer actually had one machined to the
correct spec and sent it over to the plant in Taiwan. Has no idea when the
systemic problem will be solved.
Meanwhile,
I guess the fix is to machine the wedge down some to achieve the
4-1/8" on center for the blade holders. I would not be afraid to do
that in my own shop, but I can not recommend that you do it.
An
alternative might be to ask Larry to have an engineering drawing/diagram
of the wedge emailed to you and you could take it to a machine shop for
the rework.
Good
Luck and keep me posted.
Just a
follow-up note on our conversation yesterday w/re to the distance between
the saw arms that only allow a five inch blade to fit into the blade
screw-holders spaced 4 3/4" apart (1/8" protrusions at each
end of thumb-screw clamps).
Larry
Wagner, DeWalt Product Manager (1.800.433.9258) called me today to discuss
my situation of having received three new #788 saws all with the same
problem over the last three months which have had to be replaced under
factory warranty.
He told
me that he had been receiving other complaints recently about this
situation as well. And, that he agreed that the top and bottom blade
protrusions should be about 1/4" above and below the aluminum cast
blade holder and not just the threaded thumb-screw clamp hole.
So there
you have it. Three 'Type 1' saws (a fellow sawer friend of mine,
yours and Mr. Wagners') that DO NOT exhibit this problem and,
three, 'Type 2' machines that I have received from DeWalt since November
that do have this problem. At this point I am compelled to
believe that ALL 'Type 2' saws have this type of a problem.
It would
be interesting for you to discuss this matter at your monthly scroll saw
club meeting this weekend to gather a consensus of other DeWalt #788
scroll saw users w/re to this situation. Please ask them to
call Larry Wagner to voice their concerns and complaints if they
too are experiencing this particular problem.
Thank
you again for your help.
206.543.1883
Another explainiation:
If I
understand your situation, you cannot get sufficient tension on the blade
with the tension lever. I have attached an exploded view of the scroll saw
for your reference.
Three items
to check:
1) Tension
Rod Adjustment. Referring to #24 (Rod, Draw), it threads into the Wedge
#23. Typically, it needs one or two more turns (clockwise) to enable
sufficient tension with the tension lever.
In order to
get to the rod (it is pretty easy, just takes a couple of minutes) Take
off the plastic cover (#71) by taking out the 4 screws (#44). Just loosen
the whole assembly and move it
out of the
way. Remove part #26 and part #80. You will see the tension rod and a
small bearing sleeve on the "L" end of the tension rod. Set the
sleeve aside. The rod is flexible enough to turn
it without
removing anything else. I suggest one CLOCKWISE turn, partially
reassemble, test the tension and take up another turn only if necessary. I
set mine to get proper tension at a 3
to 3-1/2
setting on the tension lever gage.
2) Item #57.
There is a pivot bolt which connects the upper arm to the main housing
assembly. If it is too tight to allow free up and down movement of the
arm, you will have difficulty installing the blades correctly. Loosen it
just enough so the arm won't stay up by itself and comes down freely - not
slowly.
3) Then,
when you install a blade, or go from hole to hole after making a cut,
gently squeeze the two arms together as you tighten the blade holder. That
way you are removing any play before
engaging the
tension lever. If the arm stays slightly raised, you are having to use the
tension lever to get back to zero before ever tensioning the blade.
I hope
this solves your problem. Beginning with proper and sufficient blade
tension with #2/0 blades will make all the difference in the world. 2/0
blades are tiny and typically don't last very
long anyway.
I cut lots of 3/4" material with #7 and almost never break a blade
before it is so dull that I need to change it anyway. Pretty much the same
with #5's. Let me know how it goes.
Ron Brown
Hello Rick I have been reading about the
problems related to the New DeWalt Saws manufactured in Taiwan. I just
bought a new saw and had the same problem with the blade chucks being to far
apart. I resolved the problem by loosening the tension bar about two to
three turns there by allowing the top arm to go a little lower. I phoned the
DeWalt service center and told them about the problem. They were quite
surprised to hear about it but they told me to go ahead and try that fix,
rather than bringing it in to them. The fix worked.
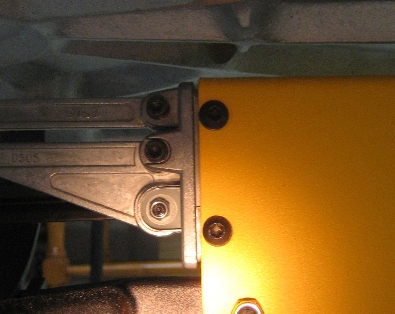
Table
hole problem
Now
when it was time to secure the cast iron top to the TRUNNION and but before
tightening the two screws that fasten the top to the trunnion I clamped a blade
on set the tension and immediately noticed that the blade is too far to the
right of the table tear drop hole… and to my amazement I could not adjust it!
I attached two pictures to this email hoping it will help understand my problem.
The table to trunnion screw holes do NOT allow left/right adjustments, only has
up/down table adjustments so I am in a fit as to how can I align the blade to
the table tear drop hole with out having the blade rub against the right side of
the tear drop opening. I suspect the table screw holes or the tear drop hole is
out of alignment and there is no hope for me to get the blade in the middle of
the tear drop hole.
Brian
D. Sorcic

Another
problem that has came up on knocking
Rick,
I have a problem with my scroll saw and I was wondering if you had heard about
this. My scroll saw (Dewalt DW788) started knocking pretty bad. I found a
solution on your web site for the same description, but it didn't fix my
problem. Since it was out of warranty, I decided to take a chance and open it
to see if I could find the problem. What I found was that the "Con Rod
Assembly" (the link between the motor and the rocker arm) was coming
apart. The link was coming off of the bearing. The only reason it wasn't
completely off, was that it was still attached to the rocker arm and actually
cut into to rocker arm. I knocked it back in place and that fixed it, but it
eventually works itself back off and I have to take it apart again. Sorry,
it's a little long but I just wanted to know if you have heard of this
problem.
Thanks,
Dan Seymour
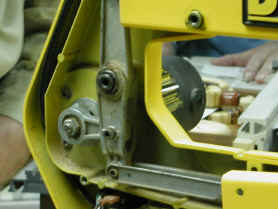
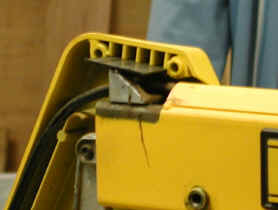
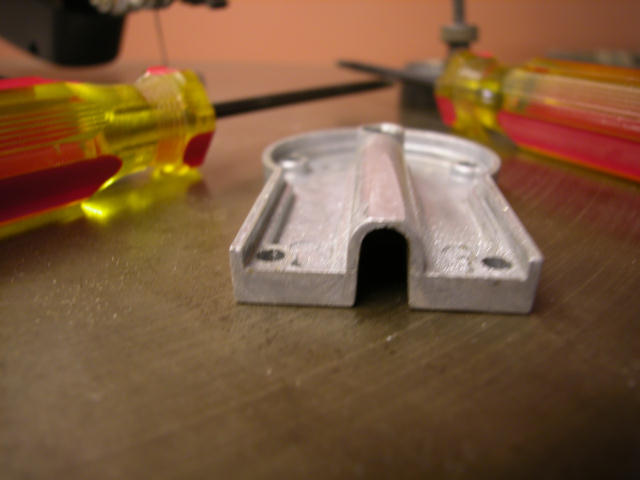
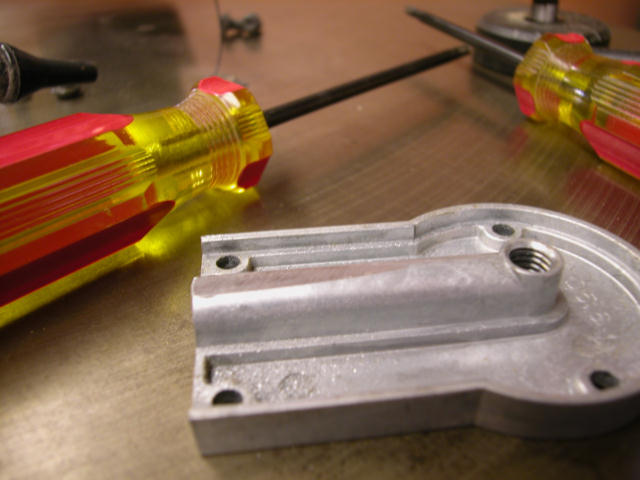
Finally
the real fix for the knocking!!!!
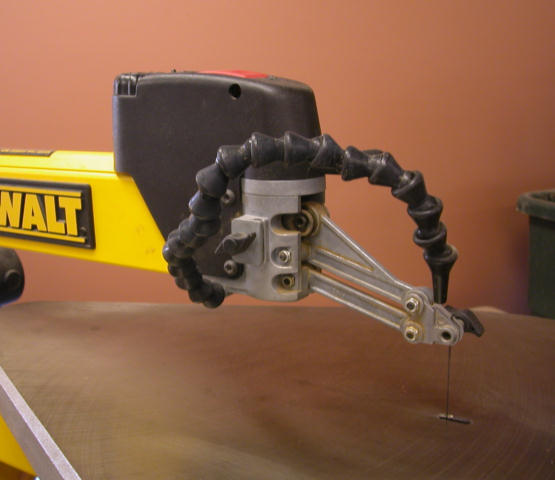 All
the problem is in the front end.
All
the problem is in the front end.
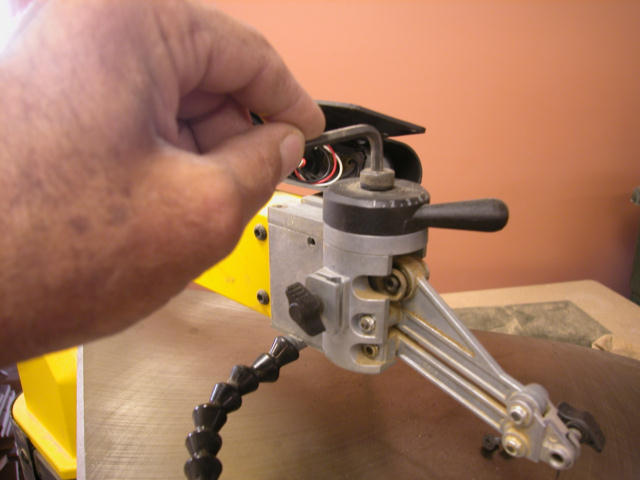
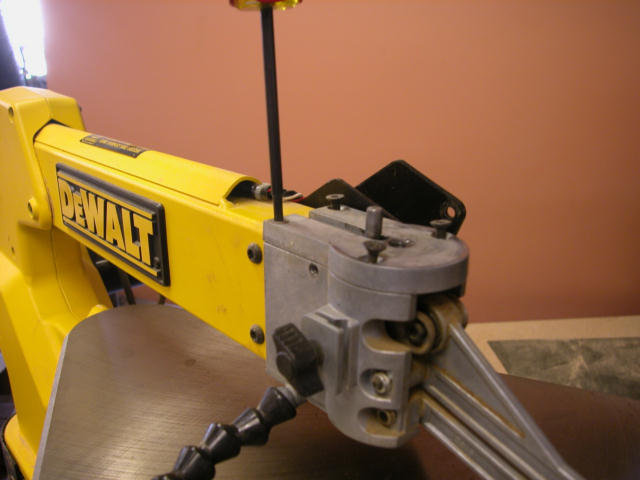
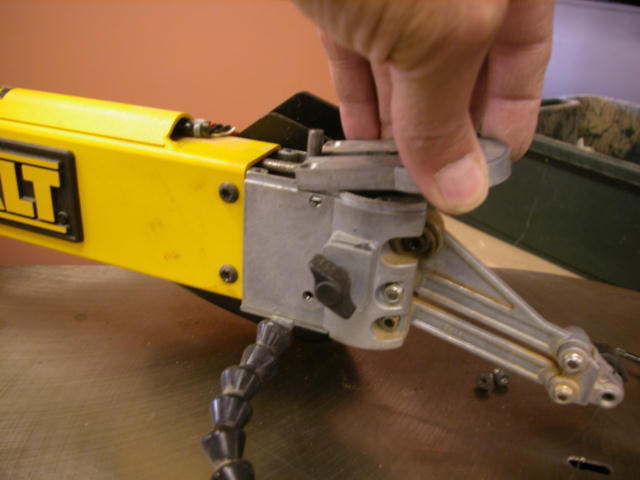
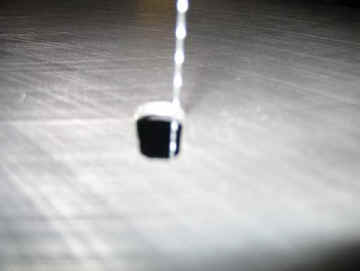
Once you have the
saw down to this point you are ready to start the fix.
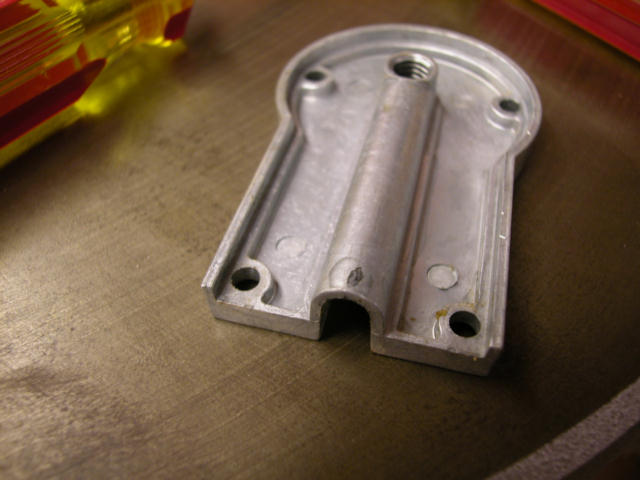
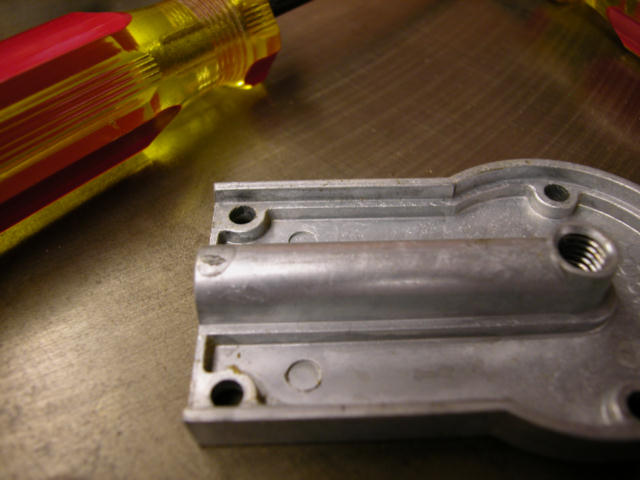
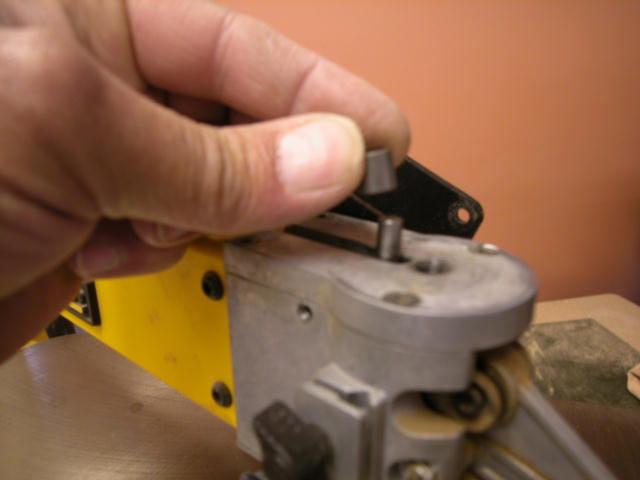
Here is the part
that needs the work. See the black spot center left, that is the knock point!
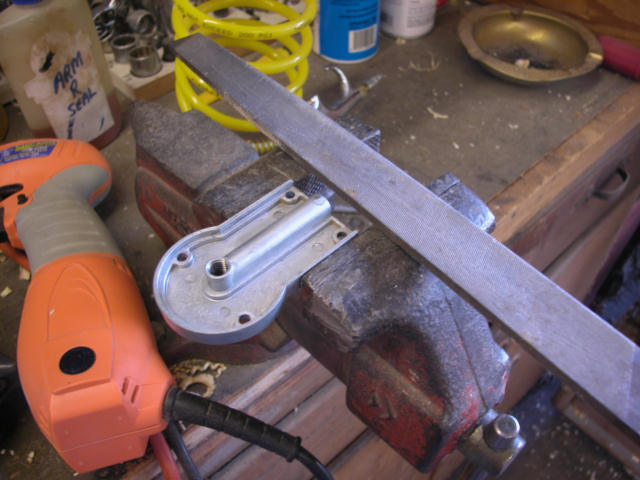
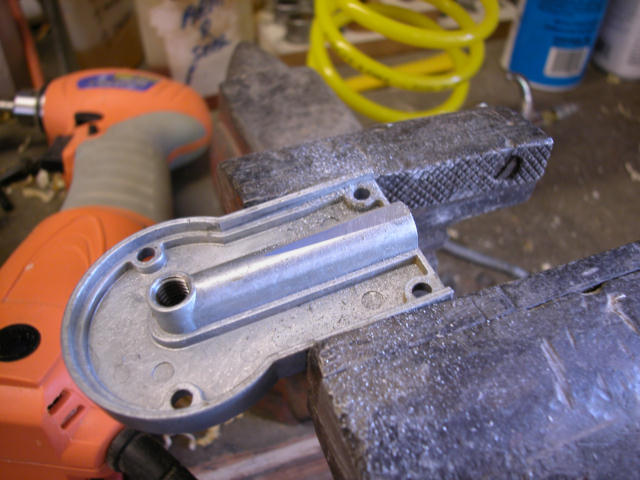
The fix is
removing some material from the bottom. I used a file but sandpaper would work
as well too.
Side to Side Fix
Dillard, Tedd A (E S SF RNA FS 11E) [tedd.dillard@siemens.com]
Rick,
I am a long time hobby wood worker, I had an old Walker Turner rigid arm saw that I got from an uncle.
It did not work very well and I did not use it much as I could do most of what I wanted on my band saw.
I got rid of the WT many years ago.
I recently got interested in a walking beam saw and spent some time on line looking at what was out there.
After reading your site and others it looked like the best saw for me was the Dewalt 788.
Surprise when I found out that my across the street neighbor had one almost new who sold it to me for $150.00.
Being a tinkering kind of guy I had read the tune up comments on your site.
My saw was in very good condition and did of have any of the problems discussed on the web site.
But one thing I noticed that was commented on in your site but not addressed was the fact that the blade holders move side to side so much.
I checked my saw and the blade holder body had about 0.020-inch of clearance side to side between the sides of the links, and the drive link and idler link had a bout 0.015-inch of clearance.
This allowed the holder to move quite a bit from side to side. It did not appear to be much of a problem when cutting but it did not make sense to me that there should be so much movement.
I took the upper assembly apart and made some shims to take up most of the movement.
I put a 0.010-inch shim on one side of the drive link pivot point and also put a 0.010-inch shim on one side of the inside end of the idler link.
I then put a 0.010-inch shim on both sides of both links at the blade holder end of the links. Some light filing was necessary to get the clearance that I wanted with the shim thickness material I had
The shims were made with a hole big enough to fit around the inner race of the bearings so there was no binding when assembled and the inner race still rests on the inside faces of the holders.
This resulted in the clearance between the sides of the links and the inside of the respective holders of about 0.003 to 0.005-inches.
I ran the saw in this condition and I could push sideways on the blade with a block of wood and I could see that the upper holder did not move any visible amount but the lower one move quite a bit.
I then shimmed the lower assembly the same as I did the upper one and ran it again.
The blade did not move at all.
I am not as experienced on a scroll saw as you and have not logged much time since the modifications but it makes sawing much more precise.
While the saw cut acceptably well before the mods it is noticeably better with the looseness taken out.
Tedd
Another problem that can cause a knocking
Submitted to me by am email:
I recently developed a random noise that became more and more constant. It was not the tension rod but the bearing on the lower front rocker arm where the piece that connects to the arm from the rear of the machine is. I have a pic if you want it but that bearing destroyed itself. Some of the needle rollers in the bearing were actually broken and the "sleeve" that fits through it had grooves from the needle rollers. I plan on greasing all of these bearings at the front once a year in an effort to prevent this from happening again.
Randy
Front to back blade movement fix; DW 788 blade forward travel
( Taken from a thread on the SSWS forum; DW 788 blade forward travel)
Redbeard (Alan) and Ocelot (Ray Morgan):
What I find how ever, is that the blade moves forward a good 1/16 inch from top of the stroke to the bottom. This seems very aggressive, and makes it very difficult to turn the wood to make tight curves, since it’s moving forward and back a lot more than the width of the kerf.
Anyway, after getting no answers from Dewalt or anyone else on a fix, I took matters into my own hands and corrected it myself. The saw is wonderful now.
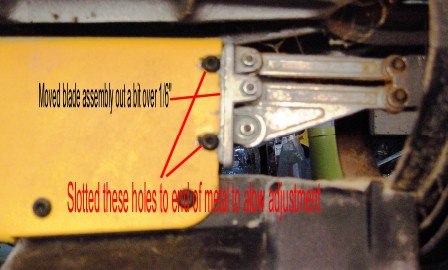
Here is the problem - The length of the top arm is longer than the length of the bottom arm. Or at least the mounting holes are off. (of course it could be opposite on yours) What I did to test this was remove the 4 torx screws that hold the bottom silver blade holder pivot assembly to the yellow frame. I moved the entire assembly out away from the yellow frame nearly 1/8" and temporarily clamped it in place. I ran the saw slow and the blade travel was nearly PERFECT! WooHoo!.
To make the fix permanent I had to use a dremel with a cutting wheel to make the 4 holes in the yellow frame into slots. Basically, I cut the metal so the holes were slots to the end of the piece. This allowed forward adjustment of the silver blade assembly.
The saw is wonderful now.
More from Ocelot (Ray Morgan):
Hmmm, It's been a while and I was trying several things from scratch, but I can think of two things. If I recall correctly, It needs to be done without a blade and you may need to give the motor a half turn or so with a flat head screw driver. There is an opening on the back of the motor and the motor shaft is slotted.
I don't think the assembly moved easily though. I know to tighten down the screws after slotting the holes, I used a flat screw driver between the yellow frame and the assembly to hold it out. It may not be necessary, but I think I also had to adjust the tension rod under the switch housing a turn or so to give it enough play to move the lower assembly. I was trying to figure it out as I went along from scratch, and trial and error, so it's hard to give a step by step instruction.
IMPORTANT - The assembly must be straight for the final clamp down - Meaning that the gap you create between the yellow frame and the silver assembly must be equal on both sides to keep the blade straight.
Also, I wouldn't make any permanent modifications or slot the holes until you test it first. If you can get the blade assembly moved out even a 16'th of an inch, and put something in there to hold it temporarily, you can put a blade in with just enough tension to take up the slack and test it. You can test it by putting a metal ruler or something behind the blade and turning the motor by hand to see the difference.
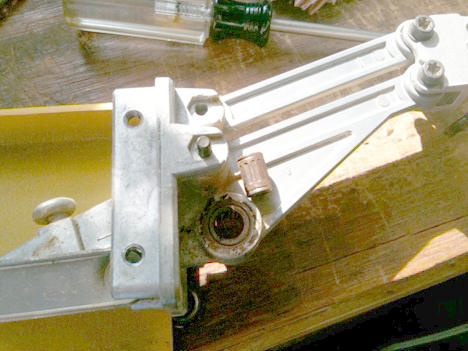
had a request from Rick for a picture of what I moved to achieve near zero forward blade travel.
It's a bit blurry since my good camera is hiding from me and I had to use an old cheapy. It should give an idea on how much I moved it. You can see the new gap between the lower blade assembly and the yellow frame. just over 1/16"
More from redbeard (Alan):
There was actually quite a bit of yellow paint compound in the holes of the two lower arm panels which I filed out, then slotted the two smaller front holes each side holding the lower blade assembly, as Ray showed.
I though maybe just removing all the paint might give enough slack in both the front and rear to help, but is wasn't quite enough. So I did slot out the front holes about 1/32 " with a needle file.
I reassembled with the arms as far forward as possible at the rear, and lower assembly as forward as possible. This is much easier in the down position. You can use a flat blade screw driver to rotate the motor from the hold in its middle.
All told, I moved the bottom assembly forward about 3/32" .
Before: in the up position the blade was furthest back but still sloped backward. In the down position it moved about 2/32" forward.
Now: in both up and down positions the blade is in the same place, with a slight swing forward of 1/32" at the middle of the swing down.
Before I couldn't make right angle turns at all without chopping up a big hole. I was wondering how on earth you guys did fancy fret work with such a machine. Now it makes clean jigsaw-like cuts!
FYI, I just used a rachet screwdriver with Torx bits T25 and T27, a small spanner and some needle files. The 2 front screws are slightly smaller than the base ones.
Just to complete this, here are a couple of pics of my adjustment. You can see the gap where I pulled the lower assembly forward.

More from Steve S.:
Couple hours in the shop and some success, but another twist to the alignment tail to add. I followed the advise and slotted the mounting holes of the lower panels. Any adjustment of the lower blade assembly outward made the problem worse in a more severe way. One of the keys to finding a root cause is figuring out what causes a reaction related to the problem. So, I moved the bottom blade holder as far back as possible and moved the top blade holder 1/64" or so forward to the limits of the existing mounting hole. That made a huge difference. It is not yet perfect, but the performance is greatly improved. Although I was content with the saw it now has less vibration over the entire range of the speed settings. Next day or so I am going to decide if making a slot in the upper panels is easier or removing metal from the forward edge of the lower panels is easier. I already know how to get the lower ones off.
Holding the arm up
Yes you can get the arm to stay up by tightening the pivot screw for the top arm. It was never recomended because it will cause wear on the pivot area, but if yours did stay up before it must have been tight. The biggest reason not to also was that you had to be sure to push the arm down all the way before attaching the blade.
A video of how to do this
Another problem that may be causing the knock
I own 2 Dewalt 788's and wanted to pass along the following information to others that have one since I've now experienced the same issue on both saws.
I posted a while back ago about the linkage coming apart on the motor cam inside the unit. Well it's happened again, only this time on my other saw. The first time I thought it might be caused by pulsing the saw with the foot pedal but the second saw does not have a foot pedal on it so that blows that theory.
For those of you that hear the knocking noise it might be worth the effort of taking it apart to check this connection. This saw had started knocking for a week or two prior and I tried turning the tension rod as shown on Rick H's site. It quieted down a little but then the connection came apart and wouldn't cut. My son was using it when he came to me and said the blade was vibrating but not cutting. Upon taking it apart there was the screw and washer sitting inside with the linkage sitting loose. Not easy to get back together but once done it runs like a top. I'm thinking a little loctite would have been a good idea but if it happens again I'll try and get some on it. Hope this might help someone else should they run into it.